filterPredicateとは
mat-tableにあるデフォルトのフィルタリング動作が設定されているので、ここにオーバーライドすることで上書きできるメソッド。
フィルタの処理をカスタマイズしたい場合は、ここの処理の戻り値を、抽出OKならtrue、そうでないならfalseを返すようにすればいいです。
実装サンプル
処理概要
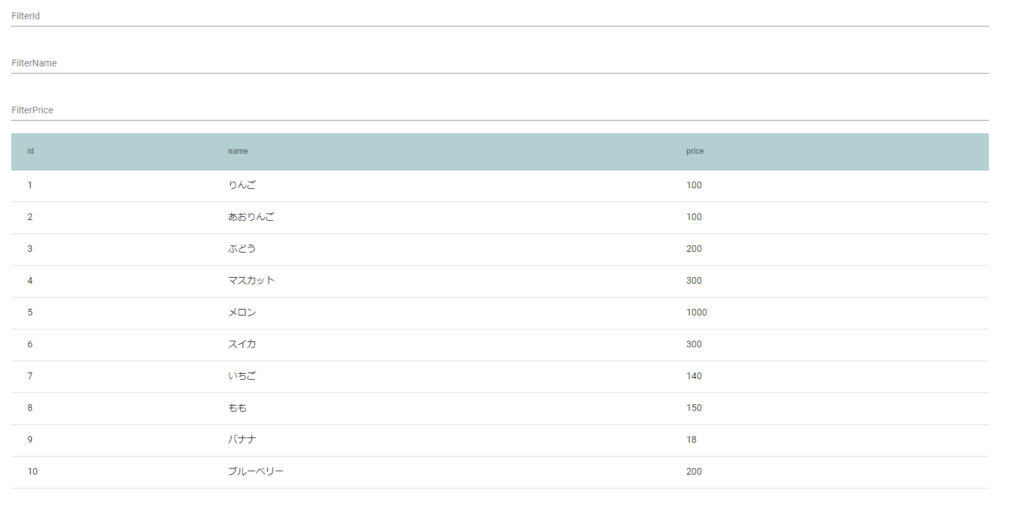
列ごとにフィルタをかけるようにしています。
フィルタ値が入っていたら、一致するものを抽出います。
また、複数のフィルタ値が設定されていたら、AND一致したものを抽出します。
実行結果

フィルタ入力後の結果

app.module.ts
MatTableModuleと、MatInputModule、MatFormFieldModuleをインポートし、
フィルタ入力フォームとテーブル描画をAngularMaterialでできるようにします。
import { NgModule } from '@angular/core';
import { BrowserModule } from '@angular/platform-browser';

import { AppRoutingModule } from './app-routing.module';
import { AppComponent } from './app.component';
import { BrowserAnimationsModule } from '@angular/platform-browser/animations';
import { MatTableModule } from '@angular/material/table'; // 追加
import { MatInputModule } from '@angular/material/input'; // 追加
import { MatFormFieldModule } from '@angular/material/form-field'; //追加

const MAT_FORM_FIELD_DEFAULT_OPTIONS= "legacy";

@NgModule({
  declarations: [
    AppComponent
  ],
  imports: [
    BrowserModule,
    AppRoutingModule,
    BrowserAnimationsModule,
    MatTableModule, // 追加
    MatFormFieldModule, //追加
    MatInputModule // 追加
  ],
  providers: [{provide: MAT_FORM_FIELD_DEFAULT_OPTIONS, useValue: {appearance: 'fill'}}],
  bootstrap: [AppComponent]
})
export class AppModule { }
app.component.ts
- テストデータを作成しています。
- chengeFilterValueメソッド内が今回の重要な個所で、フィルタの処理の個所です。
- dataSource.filterPredicateに、自分でフィルタの内容をカスタマイズして真偽値を返すようにしていて、Trueのデータを抽出しています。
- dataSource.filterのフィールド値には適当な値をいれないと、フィルタ設定していないと判断されるため、適当な値を入れてます。
import { Component } from '@angular/core';
import { MatTableDataSource } from '@angular/material/table';

export interface FoodModel {
  id: number;
  name: string;
  price: number;
}

const FOOD_DATA: FoodModel[] = [
  {id: 1, name: 'りんご', price: 100},
  {id: 2, name: 'あおりんご', price: 100},
  {id: 3, name: 'ぶどう', price: 200},
  {id: 4, name: 'マスカット', price: 300},
  {id: 5, name: 'メロン', price: 1000},
  {id: 6, name: 'スイカ', price: 300},
  {id: 7, name: 'いちご', price: 140},
  {id: 8, name: 'もも', price: 150},
  {id: 9, name: 'バナナ', price: 18},
  {id: 10, name: 'ブルーベリー', price: 200},
];


@Component({
  selector: 'app-root',
  templateUrl: './app.component.html',
  styleUrls: ['./app.component.scss']
})

export class AppComponent {
  columnName = ['id', 'name', 'price'];
  filterValues = {id:'', name:'', price:''};
  dataSource = new MatTableDataSource(FOOD_DATA);

  chengeFilterValueId(event: Event) {
    let filterValue = (event.target as HTMLInputElement).value;
    this.filterValues.id = filterValue;
    this.chengeFilterValue(filterValue);

  }

  chengeFilterValueName(event: Event) {
    let filterValue = (event.target as HTMLInputElement).value;
    this.filterValues.name = filterValue;
    this.chengeFilterValue(filterValue);

  }

  chengeFilterValuePrice(event: Event) {
    let filterValue = (event.target as HTMLInputElement).value;
    this.filterValues.price = filterValue;
    this.chengeFilterValue(filterValue);

  }

  chengeFilterValue(filterValue: string) {
    this.dataSource.filter = 'dummy';
    this.dataSource.filterPredicate = (data, filter) => {
      let result:boolean = false;
      if(this.filterValues.id == '' &&
         this.filterValues.name == '' &&
         this.filterValues.price == ''){
        return true;
      }

      if(this.filterValues.id != '' && data.id.toString().match(this.filterValues.id)){
        result = true;
      }else if(this.filterValues.id != ''){
        return false;
      }
      if(this.filterValues.name != '' && data.name.toString().match(this.filterValues.name)){
        result = true;
      }else if(this.filterValues.name != ''){
        return false;
      }

      if(this.filterValues.price != '' && data.price.toString().match(this.filterValues.price)){
        result = true;
      }else if(this.filterValues.price != ''){
        return false;
      }

      return result;
    };
  }
}
app.component.html
フォームに入力されたらフィルターのイベント処理を発生させるようにしています。
<section class="container">

  <mat-form-field appearance="standard">
    <mat-label>FilterId</mat-label>
    <input matInput (keyup)="chengeFilterValueId($event)">
  </mat-form-field>

  <mat-form-field appearance="standard">
    <mat-label>FilterName</mat-label>
    <input matInput (keyup)="chengeFilterValueName($event)">
  </mat-form-field>

  <mat-form-field appearance="standard">
    <mat-label>FilterPrice</mat-label>
    <input matInput (keyup)="chengeFilterValuePrice($event)">
  </mat-form-field>

  <table mat-table [dataSource]="dataSource">

    <ng-container matColumnDef="id">
      <th mat-header-cell *matHeaderCellDef> id </th>
      <td mat-cell *matCellDef="let data"> {{data.id}} </td>
    </ng-container>

    <ng-container matColumnDef="name">
      <th mat-header-cell *matHeaderCellDef> name </th>
      <td mat-cell *matCellDef="let data"> {{data.name}} </td>
    </ng-container>

    <ng-container matColumnDef="price">
      <th mat-header-cell *matHeaderCellDef> price </th>
      <td mat-cell *matCellDef="let data"> {{data.price}} </td>
    </ng-container>

    <tr class="header-row" mat-header-row *matHeaderRowDef="columnName; sticky: true"></tr>
    <tr mat-row *matRowDef="let row; columns: columnName;"></tr>
  </table>
</section>
app.component.css
適当にデザインするためのスタイルをいれてます。
.container {
  height: 800px;
  width: 80%;
  overflow: auto;
  margin: auto;
}

table {
  width: 100%;

}

.header-row {
  background-color: rgb(179, 207, 209);
}

.mat-form-field {
  font-size: 14px;
  width: 100%;
}

